

So this is what you have to do, start by butting the clear sheet right into the corner. Now stamp your chosen image onto the clear sheet making sure you but the stamp against the handle like this.

So what you have now is the image of your choice stamped onto the plastic sheet.
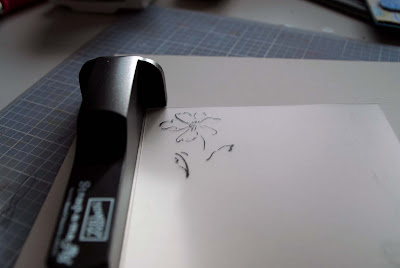
Clear? i hope so.. next I take my clear sheet and place it over my image stamped on the card, position it exactly where i want it, and cos is clear this is v easy

When you are happy with your placement butt the handle next to the clear sheet, remove the plastic sheet ink your stamp and stamp again by placing the stamp next to the handle.

Is that cool or what??? my bloom looks perfect!!! I am so made up with this but this is not all, I have now decided I want to add some wording to my topper so you ve guessed it I ve stamped my chosen word onto the plastic sheet, position it over my image

placed my handle next to the clear sheet, remove the clear sheet and stamp straight on my image. Perfecto!!! Every time!! Here is my finished card

This is one gizmo I m actually going to get a lot of use out of, just think how handy it will be for those nestabilities? being able to cut the shape, stamp you image smak in the centre then run it through to get the edges embossed....fab!! Or how about mixing different fonts from two or more different stamps to spell a one of a kind personalised message? ohh my brain hurts thinking of all the possibilities. I ve used Always artichoke, pretty in pink and whisper white cardstock, versamark, alaways artichoke, old olive, pixie pink and ruby red markers, glod brads all Stampin Up.
I love this set and I ve followed my previous post habit of taking one stamp set and making 3 cards, but I can only show you 2 tonight as I ve still have one to photograph. I just love the colours in this next one... love them
Old olive, tempting turquoise and whisper white card stock, black, tempting turquoise and old olive inks, Heartfelt and Circles of friendship stamps, tempting turquoise grosgrain ribbon all Stampin UP, black frilly ribbon May s Arts. Note how I ve stamped the sentiment on a black punched circle and white embossed? I ve just fancied a change but how good are those stamps? you can still read the words clearly even tho have been embossed.. love that!!
Finally I ve got to show you a sweet birthday card i ve made for my team mate over on UKS, it is her birthday tmrrw. I just hope she likes it!!
I ve used white ribbed white card from PaperMill, certainly celery, pixie pink card from SU, pretty in pink, pixie pink, versamark, certainly celery, old olive SU inks, stamps from PapertreyInk, ribbon and brads unknown. Thank you so much for stopping by see ya!!


Great tutorial...I'll be buying one of those :) Love the cards especially your colour choices. Welcome home!
ReplyDeletegorgeous, gorgeous cards Monica! Love that thingy magig tool too. :)
ReplyDeleteStuning Cards as always, your cards are always classy.
ReplyDeleteYET again - gorgeous cards. You cards would be great to find in a card store... they are so classy and beautifully done!
ReplyDeleteStunning cards and a fab tutorial! :)
ReplyDeleteVanessa.
HI Monica
ReplyDeleteNeeded some inspiration for making Valentines cards for the family, and knew just where Id find it. You are an inspiration. Thank you.
SallyLxxxxx
totally beautiful!! I have never used the stamp a ma jig before. Maybe I shall buy one and try it :)
ReplyDeleteGreat tutorial, you've hit on an issue that bothers all card makers! Looks like a great gadget.
ReplyDeleteMonica great tut and gorgeous cards, I wondered how it worked, I presume the plastic just wipe clean.
ReplyDeleteThank you for the card Mon!
ReplyDeleteI am the proud receiver of the gorgeous pink flower card at the end of Mon's post! Thank you!
Great tutorial. Lovely cards
ReplyDeleteThis is a great gadget.
ReplyDeleteYour card is amazing.
Fantastic tutorial Monica, thanks for passing it on, and allowing us to see how to be able to stamp as brilliantly as you!!
ReplyDeleteI will be adding the thingy magig to my SU wishlist for sure...
I forgot to say hunnie, that your cards are truely gorgeous....
ReplyDelete