Friday, 29 February 2008

I ve completed a layout

I know you d probably be as shocked as I am but i have actually made a scrapbook layout in my preparation for a workshop that Anna has hosted last night. It was a fabulos night, the ladies were all seasoned crafters so they ve sailed throught the make and take I ve designed, and managed to bag themselves a great range of Su stamps and goodies. It was such a succesful workshop, Anna s hostess benefits were two free sets of stamps and £60.00 worth of free merchandise ( she got some great benefits), Anna thanks for having me and thanks to all the girls for coming, waves and hugs to you all. And sI ve also met the gorgeous Avril who is a total virgin as far as stamping goes and she s ordered the fabulos carmaking kit *Happy Day* and I cannot wait to see how she gets on with some paper, rubber and ink, Avril already makes beautiful intricate works of art cos she loves to cross stich( Man I wish i could do that as i love the effect). So Avril if you re reading this, I would love to see what you ve come up with.
Ok so i d better show you the page, my subject is of course my delicious little nephew Luca ( love this little boy so much ahhh )


Everything on here is from SU, I was talking with the girls last night and altho most of them were primarily cardmakers they did scrapbooking as well , but they seemed to have started with cardmaking wich is where I ve started, so I ve explained how when I ve finally got scrabooking I never asociated it with stamping, it was more on the waves of patterned papers chipboard, ribbons, buttons and all of the accents but since I ve joined SU I m starting to see scrapbooking in a whole new light, so I ve tried it here, I ve used nothing but stamps with very little patterened paper, and you know what? I really like how it turned up. Used that little cute giraffe form the *bundle Of Joy* and the complete set called *Little Pieces* that I ve punched out and stuck with 3 d pads. Colours used throughout were Alaways artichoke, Bashful blue, So saffron and Choc. chip.

I ve made another criss cross card, and I ve made it just cos I wanted to use my cutie pie papers.


Easy peasy and so colourful. Used the * In the spotlight* hostess set with a jumbo eyelet and a rhinestone brad, makes the whole thing look very blingy. used So saffron cardstock, rose red and certainly celery inks, here s the inside of the card

Sentiment for the *Sincere Salutations* set

Right i m off cause I m in work tmmrw. morning so need to catch up on some sleep. Hugs to you all. See ya!!!!

Shop Stampin' Up!

Tuesday, 26 February 2008

Colouring with markers tutorial

Hello girls, I m sorry it took me a bit longer to update this time, but things are hotting up and I m trying to keep on top of it all. Right then as promissed here is my version of a colouring tutorial but instead of watercolours I am going to use markers( Stampin Up markers). Now the secret with colouring is to try an create depth to your image ( adds interest and makes the image come to life) and you can only do this with three or more shades of the same colour. For today I m going to be using Barely Banana,Apricot Appeal, Summer Sun,Pumpink Pie and Bashful Blue.

So once you ve decided on your colours is time to get starting. I ve stamped a few images and showed the colour process in steps rather than having to post 10 photos (Blogger might say NOO ). My stamp is from the Cheers to you set from SU and I ve settled on the beer pint so I could make a male card at the end.
Ok so what I ve don here was, starting with the lighter shade Barely Banana I ve just filled the image randomly theen added a bit of Apricot Appeal here and there, dont be tempted to cover the image neatly from edge to edge be random leaving some white spots.
Now that you ve got your lightest colour down start adding the others as you can see in the first image(left) I ve just went on the outside of the image ( again not neatly) with the Summer Sun marker, in the next step(middle image) I took my strongest shade Pumpkin Pie and only drew around the edges being careful not to add too much ( if you think is not enough you can alaways add more after). Now you take you lightest marker again and blend it all in. You could also blend it in very successfully by using a watercolour brush just be careful as to not put too much water as this will lighten your image to much and then you would be tempet to add more colours and you d end up rubbing more to blend and your paper will start to peel and go all bobbly and nasty.
After you re happy with how your image looks and you ve blended it all in to make the image pop further take the Bashful Blue marker and trace around the outside of the image.


And this my friends is it!!! I love those markers cos they give really bright effect and there just enough shades for you to achieve great results without having to spend £300.00 on a set that s got God knows how many hundreds of diferent shades ( I m not Michelangelo and dont want to feel the pressure of using 20 shades on one image I m only making birthday cards!!!) I m not saying SU markers are cheap they re not but what I m saying they are affordable compared to others on the market and having tried the Marvys SU are much more pigmented. I LOVE MINE!! and here is the finished card

Now would you like to get your hands on those babies? I am starting a marker club, we need four people and it runs for 4 months, each month for £35.50 you get a set of markers and a full pack of coordinating cardstock , by the end of the club you will have collected the whole marker set (all 96) with a case to keep it all in, and the whole collection of cardstock all coordinating of course. Please let me know at telemech01@aol.com.

Now I m going to show you one more card I ve made for my sample board wich is coming together nicely. I just loveit, this check the background on this card base.

Dont you just love that? I m in heaven as dots and paisley are my favorites ( I sound like Brucie lol) Certainly Celery card blank was stamped with the Paisley Background in Old Olive, a distressed layer in Pumpkin Pie, one of Bashfull blue that I ve edged with my pinking shears, sentiment form the Happy Everything set stamped in Old Olive and Pumpkin Pie( used the Stamp a ma jig), Old Olive ribbon, a flower and a half backed pearl from the pretties kit, all equals to a very nice and easy to produce card. Love how quick and how efortlessly all my cards are coming together now. Enjoy whatever you are doing and thank you for stopping by. See ya !
Shop Stampin' Up!

Tuesday, 19 February 2008

I m not happy

I think I ve broken my camera, well not really broken it, but did something to it and now all my settings are gone to pot, and I don t know how to make it better so you will have to put up with not so good piccies for now till I can sort it out. First of all I want to show you the card that belonged in the last post (take one set and make three cards)

I ve found this colour combo on SCS and decided to try it myself (not quite navy,so saffron, bashful blue,brilliant blue, and black staz on), I dont think I m overly hot on it but like the way the card came out, I ve also found a pocket card tutorial on there too (I tell you that site is fabulos!!) Note the wonky embossing at the top? hee hee I ve done that with my crop o dile and it was the last step, as you can see it didn t quite worked out like I wanted it to, but I wasn t going to start the card all over again. Oh no lol

Right my next card I ADORE!!!!! I wanted this set for like EVER!! if you remeber back when my gorgeous nephew Luca was born I ve hand drew this image to use for his card. But would you belive it I still haven t got it yet? I did however manged to get a few stamped images from a fellow SU demo Claire (thank you so much darling)


Isn t it just adorable? I ve coloured the little fella with SU markers (watch out for a tutorial coming up on this), used papers from Le Jardin collection and the colours used I think make such a change from the pastel ones used for babies( I m not saying I don t like pastels, I do a lot, but I want new fresh combos to work with from time to time so it dosent get boring) more mustard cardstock, choc chip and this delightfull blue in the paterened paper. YUM!! Also grosgrain ribbon and bits from the Hodgepodge Hardware.

In the same set there is a gorgeous teddy bear and used this along with my Big Deal Alphabet set to create this baby girl card.


Im so annoyed as this photo in particular it is so much better IRL, certainly celery cardstock, rose red layer edged with my pinking shears, polka dot background stamp( I love this stamp!) and pink passion ink were used to stamp the dots and the letters. Teddy coloured using a mixture of markers and ink pads. Cute? I tell you what, very very quick to make!!!

One more card to show you today and this time is a waterfall card. I have not made one of those for like 10 years lol, but I recently made one for the GOGO design team assignment and loved it, so I ve tried another one for the limited supply challenge on SCS, you were supposed to only use circles on your card apart from the sentiment


Sets used for this are In the spotlight, Seeing spots and Little pieces, cardstock certainly celery and choc chip., inks used are tempting turquoise, pumpkin pie, chocolate chip, summer sun brads and a jumbo eyelet, also used the dotty backround stamped in versamark on the choc cardstock.Here s a view of the pulled tab

Sentiment comes from the Sincere salutations set.

Now I see so many questions about watercolouring all the time on the boards, and I have seen so many brilliant tutorials out there on the subject, but I thought I will add my own to the list of many so please tune in later this week and I ll try and lift some of the mistery that is watercoloring. Till then see ya!! M xx

ps All images are copyrighted to Stampin'UP 1990-2008!!

Shop Stampin' Up!

Monday, 11 February 2008

Stamp a ma jig tutorial

Hello again!! I seem to have managed to blog a bit more frequently lately, which surprises me to be honest but hey while the going s good... lol.
For today s post I ve decided to show you a mini tutorial on how to use the *stamp a ma jig*, yes I know it sounds weird but let me tell you this baby is great!! Question:
How many times have you made a card and you spent ages putting it together, only to spoil it by the final *adding* of the stamped sentiment? I know so many crafters that turned to peel offs, for exactly this reason. I am an experienced crafter let me tell you( Lord knows I've had enough practise for the last 12 years) but the amount of cards I discard is quite big,because of my inability to sometimes stamp straight and in the place I want the sentiment to be, and not half an inch out. But I won't do that no more because I have found this little gadget, and I am going to show to you how it works. So you can get a better understanding of just how cool this is I m gonna do it twice.
I am using a two step stampin hostess set from Stampin Up called Heartfelt. I firstly stamp my image on a white base(i ve used SU markers to add the two different colours on my stamp)
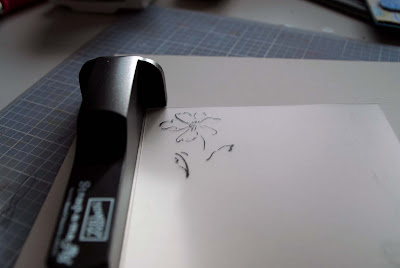
Now next step is to take your stamp a ma jig. This is what it looks like, a black handle with 2 straight 90 degree edges at the top ( is got a left and a right side) and a clear plastic sheet smooth on one side and rough on the other(you could use either but the rough side grabs the ink better).

So this is what you have to do, start by butting the clear sheet right into the corner. Now stamp your chosen image onto the clear sheet making sure you but the stamp against the handle like this.
So what you have now is the image of your choice stamped onto the plastic sheet.
Clear? i hope so.. next I take my clear sheet and place it over my image stamped on the card, position it exactly where i want it, and cos is clear this is v easy
When you are happy with your placement butt the handle next to the clear sheet, remove the plastic sheet ink your stamp and stamp again by placing the stamp next to the handle.
Is that cool or what??? my bloom looks perfect!!! I am so made up with this but this is not all, I have now decided I want to add some wording to my topper so you ve guessed it I ve stamped my chosen word onto the plastic sheet, position it over my image
placed my handle next to the clear sheet, remove the clear sheet and stamp straight on my image. Perfecto!!! Every time!! Here is my finished card

This is one gizmo I m actually going to get a lot of use out of, just think how handy it will be for those nestabilities? being able to cut the shape, stamp you image smak in the centre then run it through to get the edges embossed....fab!! Or how about mixing different fonts from two or more different stamps to spell a one of a kind personalised message? ohh my brain hurts thinking of all the possibilities. I ve used Always artichoke, pretty in pink and whisper white cardstock, versamark, alaways artichoke, old olive, pixie pink and ruby red markers, glod brads all Stampin Up.

I love this set and I ve followed my previous post habit of taking one stamp set and making 3 cards, but I can only show you 2 tonight as I ve still have one to photograph. I just love the colours in this next one... love them


Old olive, tempting turquoise and whisper white card stock, black, tempting turquoise and old olive inks, Heartfelt and Circles of friendship stamps, tempting turquoise grosgrain ribbon all Stampin UP, black frilly ribbon May s Arts. Note how I ve stamped the sentiment on a black punched circle and white embossed? I ve just fancied a change but how good are those stamps? you can still read the words clearly even tho have been embossed.. love that!!


Finally I ve got to show you a sweet birthday card i ve made for my team mate over on UKS, it is her birthday tmrrw. I just hope she likes it!!


I ve used white ribbed white card from PaperMill, certainly celery, pixie pink card from SU, pretty in pink, pixie pink, versamark, certainly celery, old olive SU inks, stamps from PapertreyInk, ribbon and brads unknown. Thank you so much for stopping by see ya!!
Shop Stampin' Up!

Tuesday, 5 February 2008

january s DT yummies

Hello, is that time again when I get to share with you what i ve been up to with the gorgeous kits i get from Scrapagogo. so without further of a do I m gonna start with my first card

I m always trying to come up with new ideas for my DT (wich is a lot of hard work let me tell you, specially when your mojo decides to up and go somewhere.. where mojos go lol). Is not so much that I m trying to come up with incredible designs, cos I think at the end of the day as cardmakers we just want to see cards that we could replicate ourselves not impossible looking ones, so i thought men cards are often left out and grandads are not often catered for, so with this in mind I ve created this card. The kit had the most gorgeous flock self adeshive lettering, so pretty simply I ve layered lots of colour coordinating circles topped with one letter on each.My next offering is this little beauty

Yummy colours, I just love the way everything blends, the end result is bright and zingy in this card, the fabulos trim was used to act as the stem for this gogrgeous layered felt flower. It was soo funny to finish this card and only to find out that i ve done this to it

See? It happens to us all and if it didn thappen to you yet let me tell you there s time LOL. I have since then put it right, just wanted you to know that

This next one I love, I make a quite a few wedding cakes over the year and I always give the happy couple a handmade card to say thank you and wish them well

I loved this paper so much and decided to pick out the detail using a glitter pen, the effect is beautiful and shimery IRL, the distressed hearts are dimensional and I ve used more of the flock letters but I ve completely covered them in glitter for extra sparkle. Can you see that beautiful amarylis in the background? For Christmas I ve had big vases full of them with white crystals on stems, and eucalyptus leaves.

Next I ve made a manly Valentine, I love the muted colours, the fitting ribbon, while buttons and the chipboard corner offer enough visual interest but still keeping it masculine looking.


I ve used a chipboard die cut to cut an aperture on the front of the card, so that my sentiment had to be placed on the inside layer, but of course due to my rubbish photographic skills you cannot see this, but is there and it dosen t look bad( you ll have to take my word for it lol).


Ive got one more card I ve made with this utterly yummy kit, and it was a recently made one for a fellow Gogo subscriber(Heather) and a challenge set by me on the gogo thread over on UKS.


The big scalloped circle on the background was part of the free stamp 4 jan. wich I ve stamped in versamark ink and the little middle circles ones are from my stash and I have no idea who they belong to. Those kits are becoming ever so popular with them seeling out with the speed of lighting, Lorraine and Janice really are pros at putting product together and I hope you found at least one good element to inspire you to make your next card or make you think about subscribing to their monthly kit. You can find more by going here

Stampers ten is now full(woohoo), thank you to all that joined, I will make this the best stampers 10 out there because is my first one lol. Let the fun begin!! see ya!!

Shop Stampin' Up!

Saturday, 2 February 2008

Samples galore!!!

I am on a roll !!! I ve been working flat out to make more samples for my inspiration board this last few days. So I ve decided that I will take one set of stamps and make three diferent cards with it. Is my first earned set wich means it was free(I love free). Is from a level one and is rightly called *Oh so lovely*
Gorgeous color combo, great stamp very little colouring, having all the colours coordinating= a beautiful card that takes no time at all to make. Note the distressed edge? well you ve probably seen this on my cards in the past but I have to share my new discovery, he his my new best friend *The cutting kit*

This little thing is great, the rounded flower shape is a 7 sided distressing tool, this gives you fabulosly distressed edges in seconds( now before this I used to have the one from Heidi Swapp and it used to drive me mad, it has only got one blade(wich is positively blunt and has bee since the day I ve purchased it) and is such an awakard shape but I ve learned to struggle with it over time, the shock I ve had when I first tried this new one WOW!! no comparison)you also get three little essential aides especially for when on the road, one is a scoring tool, one a rotary cutter and you even get one of those scoring blades for making lovely ticket like thinghies and do you know what? it WORKS!!! it all works like a dream(yeah I am suprised because I am tired of buying blades and gizmos that I could never get to work once i got them home), so I thought I share this one with you.

My next card was made to appeal to the minimalist lover out there, again super easy but what makes it special is the fantastic colours, used red rose cardstock and alaways artichoke for stamping. This is what I love most about SU their coloured cardstock and coordinating ink pads, you might not like their stamps designs or patterened papers or any of the accessories but you cannot fail to like their cardstock colours and matching ink pads. no way HOSE!!! Note I ve coloured the little seeds? Firsty I ve used a white signo pen then I went over with my rose red marker to match the cardstock. just makes the seeds(or whatever they are) pop. I love that.


The next one was made to appeal to a diferent age group, I love the poppy image in the set and if used by itself would make a modern and fresh card, but as I said I wanted this card to appeal to a diferent age group and decided to mask the poppies and create a bunch of them. Again just look at those beautiful colours used for the card, aren t they just yummy?(really rust, so saffron and choc chip)


Ever so simple design and none of the layering that I normally use on my cards, but I do love them, and another thing I love is colouring with my ink pads(so much faster), the little sentiment on here is by Anna Griffin.

Stampers ten update, after my last blog a few of you decided to join me(thank you, I like it when people take my threats seriously lol), we are now waiting for 2 more people. As soon as this two spots fill we can start. I know you are all anxious to start ordering your goodies but please bare with me on this. XXX

ETA. We have one more spot left!!! if you are interested please get in touch by email telemech01@aol.com M xx

That s all for today but just wanted to say thank you all for the lovely comments you leave on my blog, I do apreciated them and to show that I ve made a card for you all, if you ever left me a comment this is for you THanks!! M xx

See ya!!!
Shop Stampin' Up!